Are you a camera-shy person but looking for a presenter of your channel as an energetic presenter can significantly enhance your channel’s appeal? No worries, you can solve this issue by using and creating engaging videos with a virtual presenter, or even a clone avatar of yourself.
Today’s blog is all about exploring the top seven AI avatars or virtual presenters Generator available on the Internet. Also, helping you find the perfect digital face for your content without ever stepping in front of the camera.
See the video blog here
1. Akool AI
You may know Akool AI as one of the best face swap AI tools, but it’s much more than just a face swap or deep fake maker. Akool is an AI tools hub that now allows users to create high-quality, realistic AI avatar videos. In this guide, you will be driven to know how it works. Simply head over to this link and create an account using your Google or email, and start creating.
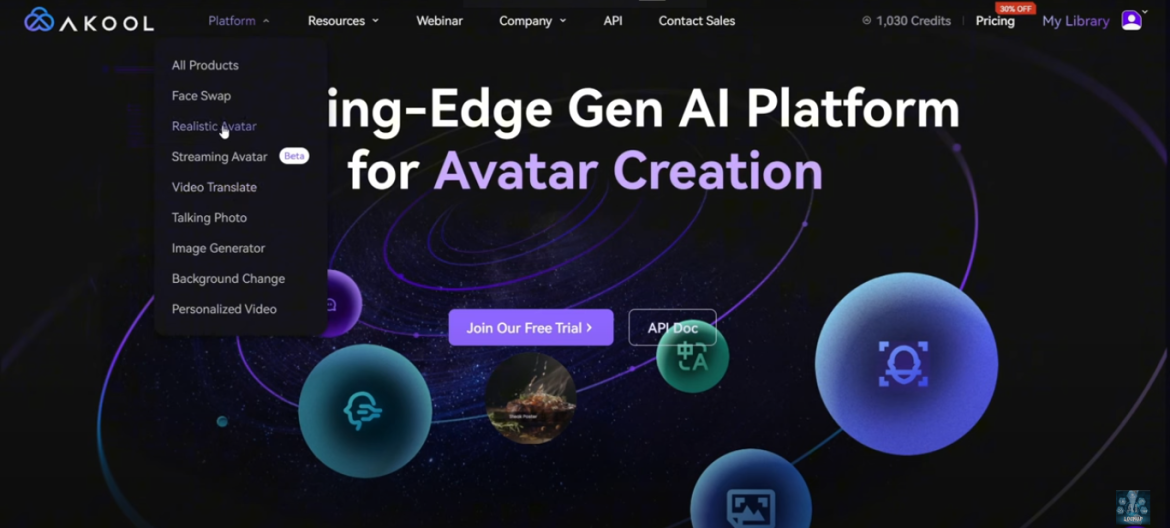
Once you are logged in, go to the platform menu button, where you will see all the products of Akool AI.

To create an avatar, select the Realistic Avatar feature and then on the next page, click on the get started button. Then you will get the Akool Avatar video generator interface like the picture below.
Now let’s know about the features available in this feature-
1. First, in the Template tab, you’ll find customizable templates that you can use and modify to create your video.
2. If you want to customize one, select your preferred template and click the Start Editing button. If you want to start from scratch, go back to the Media tab, and you’ll find all the assets and media you’ve uploaded to Akool.
3. Next, the Avatar tab contains all the realistic avatars available in Akool, allowing you to select one or upload your own to begin creating your video.
4. Then in the Element tab, you’ll find a vast library of stickers, emojis, icons, and images to enhance your video.
5. Then the Title tab lets you add titles, while the Assets tab allows you to upload media from your device.
To create a new avatar video, go back to the Avatar tab, select or upload an avatar from the Akool Avatar Library, and you’re ready to start. You’ll notice that all the avatars are very realistic and high quality.
- So first select an avatar of your choice in this case, you can select a fixed background avatar. However, if you want to use a custom background, choose one of the avatars without a background.
- After selecting the avatar, you need to insert the audio. There are three options:
1. You can generate a voiceover from text
2. Upload your own audio,
3. Generate songs from lyrics—yes, Akool allows you to make your avatar sing.
- So, let’s go with the text-to-speech option and enter the script.
- After entering the script in the provided box, you need to select the voice actor. You can choose from the premade voice library or clone your voice.
- Here, to clone a voice, simply upload a voiceover clip with no background music or noise longer than 10 seconds.
- Once uploaded, Akool will create a clone immediately.
- After selecting the voice actor, click the Generate Audio button, and the avatar with audio will be added to the timeline.
Now you can add media elements or text to your video to make it more engaging. Once you’re finished, click on Generate Premium Result to start the video creation process. You can track the progress in the My Library tab, which may take some time.
Creating Own Avatar
Now, let’s explore how to upload your own avatar and make it sing.
- So, returning to the Avatar Generator page, go to the Avatar tab, and click on the New Avatar button.
- Then, upload your video or image.
- After adding the avatar, select the video and go to the Audio tab. Here you can generate a song from a script or upload a song.
- Another interesting feature here is the ability to swap the face of the avatar with any face. It will allow you to create your digital version.
- To do this, click on the Swap Face icon and upload the source face image.
- Once you’re done, click on Generate Premium Result. Then wait for the result to be ready to preview.
You will find the result outstanding and this is how you can create any kind of avatar for your YouTube channel.
2. HeyGen
The next tool is the HeyGen AI which is another popular AI Avatar video generator known for its ability to produce studio-quality videos with AI-generated avatars and natural-sounding voice overs. After arriving on the HeyGen homepage, click on Get Started for Free and create your account. Once you’re logged in, your interface will look like the following picture, with various templates available to create AI videos.

- So first of all, to create an avatar video, go to the Avatars tab where you will find three options:
a. Instant Avatar – It helps to look more realistic and includes gestures, but you can’t change the background
b. Photo Avatar – It allows you to make a still image talk
c. Studio Avatar– It is very realistic and works with both hand and facial gestures
- HeyGen has a vast library of Studio avatars, so you’ll need to select one from the Studio Avatar.
- Now, click on Create with AI Studio and choose the video aspect ratio, which will take you to the video creation interface.
- If you want to create a full video, go to the Template tab, where you will find a wide range of video templates.
- Next in the Avatar tab, you can change the avatar if needed.
- Then in the Script section you need to upload your script that you can write using ChatGPT, or paste an existing script into the box.
- Then you need the voiceover so, if you already have a voiceover clip, you can upload the audio clip there.
- After entering the script, you will need to select a voice actor.
- Okay now you can add text and other elements to your video to make it captivating.
- Next if you want to swap the Avatar with any custom face click on the face swap Icon and upload the source face image.
- Once everything is set, hit the submit button and it will take some time to generate the video to preview.
After previewing the whole video, you will find the result outstanding and this is how you can create any kind of avatar for your YouTube channel.
Special Feature
Another important feature of HeyGen needs to be discussed by which you can actually clone yourself and generate videos with your avatar and voice. However, this feature is available only for the premium user.
3. CapCut
The next tool is CapCut which might surprise you, as it’s widely known as a popular video editor. However, CapCut has now become even more powerful with several AI features, allowing you to create high-quality avatar videos. At the moment, only the CapCut web version supports this feature, so click on this link to get started.
- If you’re new to CapCut, you’ll need to create an account first.
- Once logged in, you’ll be taken to a page with various tools such as:
a. Clips to Video
b. Script to Video
c. Long Video to Shorts and
d. Product URL to Video on your dashboard.
e. Scrolling down, you’ll find a vast library of editable templates.
- To create an AI avatar video, click on the Create New button and select the aspect ratio. In this case, the suitable ratio is 16:9.
- This brings you to the video editor page. Now head over to the Elements tab, where you’ll find a large collection of stock videos and images.
- Now, scroll down to locate the AI Character option, then click on See All to browse all the available CapCut AI characters.
- Then you’ll find a wide variety of characters to choose from—select the one that suits your project best.
- Once the character is added to the video timeline, go to the AI Character Settings on the right side of the page, where you can customize-
- The character’s appearance,
- Change their frame, and
- Insert your script into the Narration box (you can enter up to 1,000 characters at a time).

- After entering the script, choose a voice actor by listening to samples and selecting the one that best fits your character.
- Once everything is set, hit the Apply button and CapCut will generate the speech and lip sync for your character.
All right, this is how your video is ready now you can add background, text and elements to the video. Once you are done click on the export button and get your final video ready.
4. Dupdub
The next tool is Dupdub AI. You may know it as one of the best text-to-speech generators but it’s more than a text-to-speech generator. With Dupdub you can create amazing AI avatar videos effortlessly.
- So, once you’re logged in, click on the Studio button, where you’ll find a wide range of AI-powered features.
- To begin, select the AI Avatar option which will take you to the AI Avatar generator page, where you can create talking avatars. There you will get four options:
a. Upload your own avatar image,
b. Choose a template image,
c. Generate an avatar image, or
d. Use a Gesture Avatar.
- Here, you can use the Gesture Avatar, which offers a variety of hyper-realistic avatars in different styles and outfits for both male and female characters.
- After selecting an avatar, move on to the audio section. There are three ways to add audio:
1. Generate audio
2. Upload an audio clip
3. Record your own voice
- You can generate a voiceover using Dupdub. For this, enter your script into the box provided (note that the script can be up to 3,000 characters long).
- After entering the script, click to change the voice actor. Dupdub offers a wide selection of voice actors, including celebrity voices, and even allows you to clone your own voice for use in your videos.
- So, you can select the ultra-realistic voiceover option from Dubdub. By setting filters for language (e.g. English with a US accent), gender, and quality, you can narrow down the options.
- After listening to a few samples, select the best one.
- Once the avatar, script, and voice actor are set, click on the Generate Talking Avatar button and it will take some time to process and generate the video.
- Now, in the photo Avatar option, you can choose one avatar from there or upload your own photo or generate a new image with AI. Here, you can swap faces with the face of the Avatar with your own face.
- Once your avatar is ready, insert the voice and then hit the generate talking Avatar button to get your video ready.
The result will be found awesome however there is a catch that you can’t change the background of this video.
5. D-ID Studio
The next tool is the D-ID Studio which is one of the best and most popular talking Avatar generators. However, it charges a lot to generate a video. All right once you are logged in to your account, your interface will be like this.

- To create an avatar video, first of all, click on the Create a Video button from the menu. This will take you to the D-ID Studio Video Creator page.
- Then go to the Avatar tab, where you will find a wide range of avatars to choose from.
- After selecting one, you will notice an important feature called Movement, where you can choose between Natural or Lively movements for your avatar.
- Next, head over to the Script tab, where you can either enter a text script or upload an audio clip. If you choose to enter a text script, you will need to select the perfect voice actor from the available options.
- You can also add a background to your video in the background tab, and finish by adding any necessary text.
- Once everything is set, simply hit the Generate Video button, and your video will be ready shortly.
6. Mango AI
The next tool is the Mango AI which is another AI video generator by mango animate. So first you need to create an account by clicking on this link.
- After creating an account, click on Create AI Video and Photo to enter the Mango AI interface.
- There, you will find four options for creating AI videos and one for photo editing.
- To create an AI avatar video, select the Talking Head Video option.
- On that page, choose the Lip Syncing Custom option, where you will find a variety of avatars, including several cartoon characters.
- After selecting an avatar, click the Create button, which will take you to the Mango AI Video Creator interface.

- First, enter your script. Next, go to the AI Voice Act Settings. Mango AI integrates with three major AI voice generator platforms:
a. Amazon AWS Poly,
b. Azure, and
c. 11Eleven Labs.
- You can generate voiceovers in multiple languages using any of these platforms.
- So, select based on the choice to generate the voiceover.
- After choosing your platform, select the language and listen to various voice samples to find the best fit for your video.
- Once you’ve selected the voice actor, you can set the Title, Style and Font.
- Then, in the Background tab, you can either change the existing background or upload a new one.
- Next, in the Avatar tab, you can swap the avatar or upload a new avatar image.
- A unique feature of Mango AI is it also allows you to Swap Faces on the avatar and use your own face. For this, you need to upload a source face image, and once it’s uploaded, click the Face Swap button.
- Once everything is set, hit the Create AI Video button, and your result will be generated within a moment.
7. Hedra AI
The last but not the least tool is Hedra AI which is actually a new lip sync generator tool. Till now it is in the better version.

- So, first, create an account by clicking on this link. Once you’re logged in, enter your script or upload a voiceover clip in the designated tab.
- After entering the script, choose a voice actor from the available options.
- Then in the Avatar Settings, note that Hedra AI does not have built-in avatars, so you will need to either generate or upload one.
- Here, you can upload an image to use as the avatar.
- Once everything is set, simply hit the Generate Video button, and your video will be ready in no time.
After previewing the whole video, you would like the result. So, these are the tools that can help you to create the avatar for your content.